Complete Solutions to Subjective of chapter EXPERIMENTS of Class 11 book with complete answers and questions
| Class 11 | PHYSICS |
| Chapter | EXPERIMENTS |
| DC PANDEY | Subjective |
| Number Of Questions | 15 |
| Academic Year | 2023-24 |
In a meter bridge set up, which of the following should be the properties of the one meter long wire?
03:49View SolutionFor determination of resistance of a coil, which of two methods is better Ohm's law method or meter bridge method ?
04:53View SolutionWhich method is more accurate in the determination of `f` for a concave mirror.
(i) `u` versus `v` or
(ii) `(1)/(u)` versus `(1)/(v)` graphs ?04:24View SolutionWhy is the second resonance found feebler than the first ?
02:13View SolutionWhy is the meter bridge suitable for resistance of moderate values only ?
03:20View SolutionCan we measure a resistance of the order of `0.160 Omega` using a Wheatstone's bridge ? Support your answer with reasoning.
02:31View Solution`19` divisions on the main scale of a vernier callipers coincide with `20` divisions on the vernier scale. If each division on the main scale is of `1 cm`, determine the least count of instrument.
01:06View SolutionIn a vernier callipers, `1 cm` of the main scale is devided into `20` equal parts. `19` divisions of the main scale coincide with `20` divisions on the vernier scale . Find the least count of the instrument.
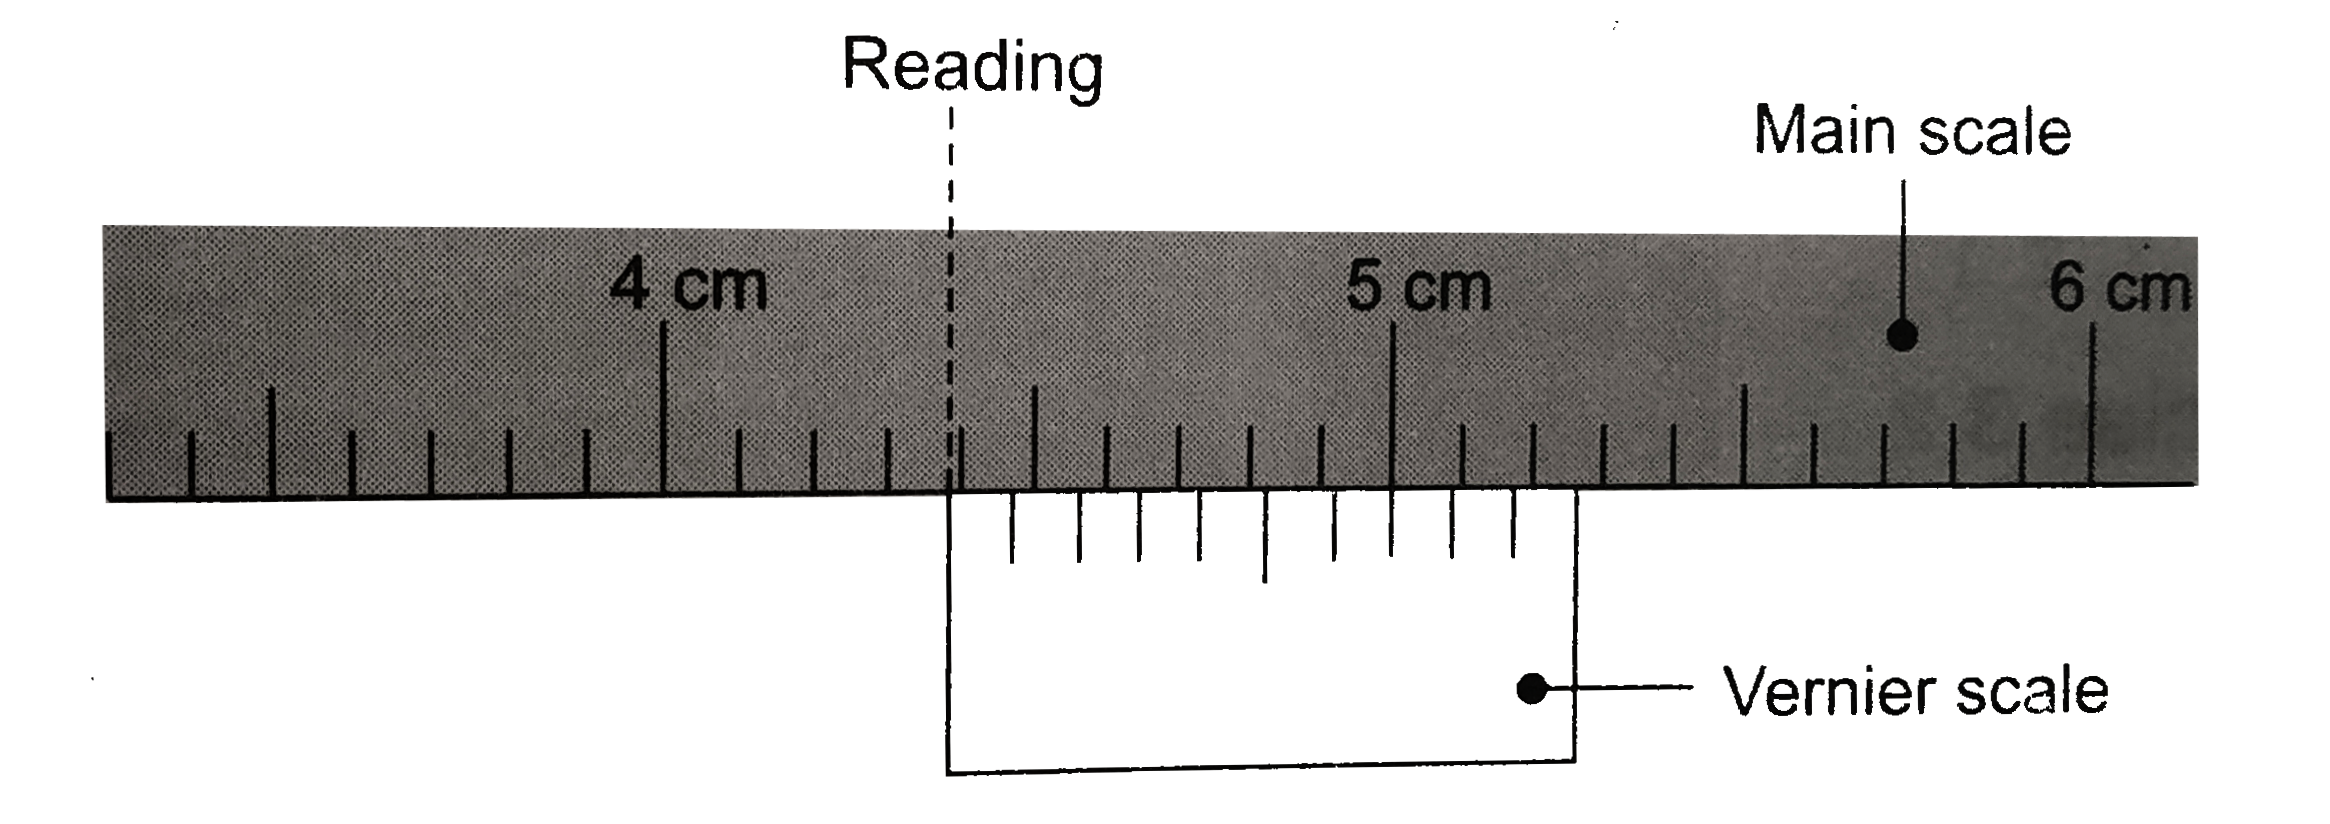
01:24View SolutionThe diagram below shows part of the main scale and vernier scale of a vernier callipers, which is used to measure the diameter of a metal ball. Find the least count and the radius of the ball.
 .03:48View Solution
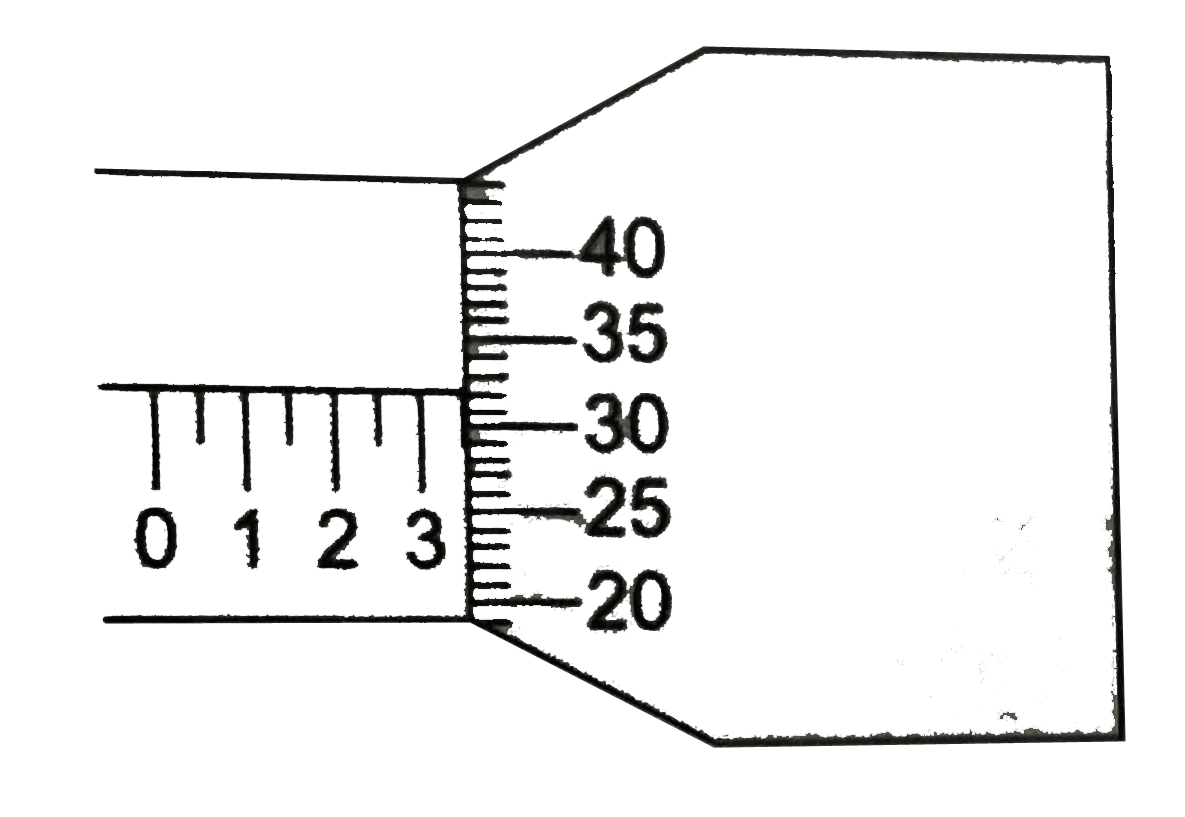
The given diagram represents a screw gauge. The circular scale is divided into `50` divisions and the linear scale is divided into millimeters. If the screw advances by `1 mm` when the circular scale makes `2` complete revolutions, find the least count of the instrument and the reading of the instrument in the figure.
 .02:02View Solution
The pitch of a screw gauge is `0.5 mm` and there are `50` divisions on the circular scale. In measuring the thickness of a metal plate, there are five divisions on the pitch scale (or main scale) and thirty fourth divisions coincide with the reference line. Calculate the thickness of the metal plate.
01:38View SolutionThe pitch of a screw gauge is `1 mm` and there are `50` divisions on its cap. When nothing is put in between the studs, `44th` divisions of the circular scale coincides with the reference line and the line and the zero of the main scale is not visible or zero of circular scale is lying above the reference line. When a glass plate is placed between the studs, the main scale reads three divisions and the circular scale reads thre divisions and the circular scale reads `26` divisions. Calculate the thickness of the plate.
02:55View SolutionThe pitch of a screw gauge is `1 mm` and three are `100` divisions on its circular scale. When nothing is put in between its jaws, the zero of the circular scale lies `6` divisions below the reference line. When a wire a placed between the jaws, `2` linear scale divisions are clearly visible while ` 62` divisions on circular scale coincide with the reference line. Determine the diameter of the wire.
02:18View SolutionLeast count of a vernier callipers is `0.01 cm` When the two jaws of the instrument touch each other the `5th` division of the vernier scale coincide with a main scale division and the zero of the vernier scale lies to the left of the zero of the main scale. Furthermore while measuring the diameter of a sphere, the zero markof the vernier scale lies between `2.4 cm` and `2.5 cm` and the `6th` vernier division coincides with a main scale division. Calculate the diameter of the sphere.
03:06View SolutionThe edge of a cube is measured using a vernier callipers. [`9` divisions of the main scale is equal to `10` divisions of the vernier scale and `1` main scale dividsion is `1 mm`]. The main scale division reading is `10` and `1st` division of vernier scale was found to be coinciding with the main scale. The mass of the cube is `2.736 g`. Calculate the density in `g//cm^3` upto correct significant figures.
02:50View Solution
Subjective questions and complete solutions for chapter EXPERIMENTS of DC PANDEY PHYSICS (HINGLISH) of Class 11
