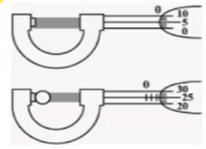
Two full turns of the circular scale of a screw gauge cover a distance of on its main scale. The total number of divisions on the circular scale is . Further, it is found that the screw gauge has a zero error of . While main scale reading of and the number of circular scale divisions in line with the main scale as . the dimeter of the wire is
3.32 mm
3.73 mm
3.67 mm
3.38 mm
The correct Answer is:D
To find the diameter of the wire using the given parameters, we will follow these steps:
Step 1: Determine the Pitch of the Screw Gauge
The pitch of the screw gauge is defined as the distance moved by the screw for one complete turn of the circular scale.
Given that:
- Two full turns cover a distance of 1 mm.
Therefore, the distance covered in one turn (pitch) is:
Pitch=1 mm2=0.5 mm
Step 2: Calculate the Least Count of the Screw Gauge
The least count (LC) of the screw gauge can be calculated using the formula:
Least Count=PitchTotal Number of Divisions
Given that:
- Total number of divisions on the circular scale = 50
Substituting the values:
Least Count=0.5 mm50=0.01 mm
Step 3: Calculate the Observed Reading
The observed reading of the screw gauge can be calculated using the formula:
Reading=Main Scale Reading+(Circular Scale Reading×Least Count)−Zero Error
Given:
- Main Scale Reading (MSR) = 3 mm
- Circular Scale Reading (CSR) = 35 divisions
- Zero Error = -0.03 mm
Substituting the values:
Reading=3 mm+(35×0.01 mm)−(−0.03 mm)
Reading=3 mm+0.35 mm+0.03 mm
Reading=3.68 mm
Step 4: Final Calculation of the Diameter
The diameter of the wire is equal to the observed reading calculated above:
Diameter of the wire=3.68 mm
Final Answer
The diameter of the wire is 3.68 mm.
---
The pitch of the screw gauge is defined as the distance moved by the screw for one complete turn of the circular scale.
- Two full turns cover a distance of 1 mm.
Pitch=1 mm2=0.5 mm
The least count (LC) of the screw gauge can be calculated using the formula:
Least Count=PitchTotal Number of Divisions
- Total number of divisions on the circular scale = 50
Least Count=0.5 mm50=0.01 mm
The observed reading of the screw gauge can be calculated using the formula:
Reading=Main Scale Reading+(Circular Scale Reading×Least Count)−Zero Error
- Main Scale Reading (MSR) = 3 mm
- Circular Scale Reading (CSR) = 35 divisions
- Zero Error = -0.03 mm
Reading=3 mm+(35×0.01 mm)−(−0.03 mm)
Reading=3 mm+0.35 mm+0.03 mm
Reading=3.68 mm
The diameter of the wire is equal to the observed reading calculated above:
Diameter of the wire=3.68 mm
The diameter of the wire is 3.68 mm.
Topper's Solved these Questions
Similar Questions
The combination of plots which does not represent isothermal expansion of an ideal gas is :

View SolutionA box weighs 196 N on a spring balance at the noth pole. Its weight recorded on the same balance if it is shifted to the equator is close to (take g=10ms−2 at the north pole and the radius of the earth = 6400 km) :
View SolutionIf x and y are arbitrary intensive variables, then
View SolutionTwo full turns of the circular scale of a screw gauge cover a distance of 1mm on its main scale. The total number of divisions on the circular scale is 50. Further, it is found that the screw gauge has a zero error of −0.03mm. While main scale reading of 3mm and the number of circular scale divisions in line with the main scale as 35. the dimeter of the wire is
View SolutionIn a screw gauge, the main scale has divisions in millimetre and circular scale has 50 divisions. The least count of screw gauge is
View SolutionThe number of circular divisions on the shown screw gauge is 50 it moves 0.5mm on main scale for moone complete rotation Main scale reading is 2 The diameter of the balls is
 .
.
View Solutionif 17 divisions of the circular scale of a screw gauge are below the index line of the pitch scale then the zero error is "_______" circular divisions.
View SolutionTwo full turns of the circular scale of a screw gauge cover a distance of 1 mn on its its main scale . The total number of divisions on the circular scale is 50. Further m it is found that the screw gauge has a zero error of - 0.02 mm . While measuring the diameter of a thin wire , a student notes the main scale reading of 4 mm and the number of circular scale divisions in line with the main scale as 37. The diameter of the wire is
View SolutionCircular scale of a screw gauge moves through 4 divisions of main scale in one rotation. If the number of divisions on the circular scale is 200 and each division of the main scale is 1 mm., the least count of the screw gauge is
View SolutionTwo full turns of the circular scale of a screw gauge cover a distance of 1 mm on its main scale. The total number of divisions on the circular scale is 50. Further it is found that the screw gauge has a zero error of -0.03 mm. While measuring the diameter of a thin wire, a student notes the main scale reading of 3 mm and the number of circular scale division in line with the main scale as 35. The diameter of the wire is
View SolutionTwo full turns of the circular scale of a screw gauge cover a distance of 1mm on its main scale. The total number of divisions on the circular scale is 50. Fuerther, it is found that the screw gauge has a zero error of −0.03 mm, while measuring the diameter of a thin wire , a student notes the main scale reading of 3 mm and the total no. of circular scale divisions in line with the main scale as 35. The diameter of the wire is
View SolutionTwo full turns of the circular scale of a screw gauge cover a distance of 1mm on its main scale. The total number of divisions on the circular scale is 50. Fuerther, it is found that the screw gauge has a zero error of −0.03 mm, while measuring the diameter of a thin wire , a student notes the main scale reading of 3 mm and the total no. of circular scale divisions in line with the main scale as 35. The diameter of the wire is
View SolutionTwo full turns of the circular scale of a screw gauge cover a distance of 1mm on its main scale. The total number of divisions on the circular scale is 50. Fuerther, it is found that the screw gauge has a zero error of −0.03 mm, while measuring the diameter of a thin wire , a student notes the main scale reading of 3 mm and the total no. of circular scale divisions in line with the main scale as 35. The diameter of the wire is
View SolutionTwo full turns of the circular scale of a screw gauge cover a distance of 1 mm on its main scale . The total number of divisions on the circular scale is 50. Further more it is found that the screw gauge has a zero error of - 0.02 mm . While measuring the diameter of a thin wire , a student notes the main scale reading of 3 mm and the number of circular scale divisions in line with the main scale as 37. The diameter of the wire is
View SolutionTwo full turns of the circular scale of a screw gauge cover a distance of 1 mm on its main scale . The total number of divisions on the circular scale is 50. Further more it is found that the screw gauge has a zero error of - 0.02 mm . While measuring the diameter of a thin wire , a student notes the main scale reading of 3 mm and the number of circular scale divisions in line with the main scale as 37. The diameter of the wire is
View Solution
