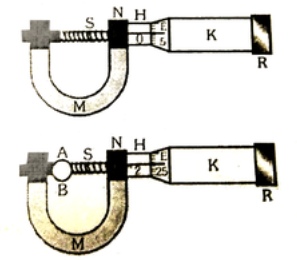
A wire of resistance R=100.0Ω and length l=50.0cm is put between the jaws of screw gauge Its reading is shown in Pitch of the scregauge is 0.5mm and there are 50 division on circular scale Find its resistivity in correct significant and maximum permissible error in p (resistivity) .
To find the resistivity of the wire and its maximum permissible error, we will follow these steps:
Step 1: Calculate the Diameter of the Wire
The reading of the screw gauge gives us the diameter of the wire. The pitch of the screw gauge is given as 0.5 mm, and there are 50 divisions on the circular scale.
Using the formula for the diameter:
d=(Reading on circular scale+Pitch×Number of divisions)
Assuming the reading on the circular scale is 8.42 divisions, we can convert this into mm:
d=8.42mm=8.42×10⁻³m
Step 2: Calculate the Cross-sectional Area of the Wire
The cross-sectional area A of the wire can be calculated using the formula for the area of a circle:
A=πd24
Substituting the value of d:
A=π(8.42×10⁻³)24
Step 3: Calculate the Resistivity
The resistivity ρ can be calculated using the formula:
ρ=R⋅Al
Where:
- R=100Ω
- l=50cm=0.5m
Substituting the values:
ρ=100⋅A0.5
Step 4: Calculate the Maximum Permissible Error in Resistivity
To find the maximum permissible error in resistivity, we need to calculate the relative errors in R, d, and l.
1. Error in Resistance R: Assume ΔR=0.1Ω
ΔRR=0.1100
2. Error in Diameter d: Assume Δd=0.01mm=0.01×10⁻³m
Δdd=0.01×10−38.42×10−3
3. Error in Length l: Assume Δl=0.1cm=0.001m
Δll=0.0010.5
Now, the total relative error in resistivity ρ can be calculated as:
Δρρ=ΔRR+2Δdd+Δll
Step 5: Calculate the Percentage Error
Finally, multiply the total relative error by 100 to get the percentage error in resistivity.
Final Calculation
Now, substituting all the values and calculating will give us the resistivity and the maximum permissible error.
The reading of the screw gauge gives us the diameter of the wire. The pitch of the screw gauge is given as 0.5 mm, and there are 50 divisions on the circular scale.
d=(Reading on circular scale+Pitch×Number of divisions)
d=8.42mm=8.42×10⁻³m
The cross-sectional area A of the wire can be calculated using the formula for the area of a circle:
A=πd24
A=π(8.42×10⁻³)24
The resistivity ρ can be calculated using the formula:
ρ=R⋅Al
- R=100Ω
- l=50cm=0.5m
ρ=100⋅A0.5
To find the maximum permissible error in resistivity, we need to calculate the relative errors in R, d, and l.
ΔRR=0.1100
Δdd=0.01×10−38.42×10−3
Δll=0.0010.5
Δρρ=ΔRR+2Δdd+Δll
Finally, multiply the total relative error by 100 to get the percentage error in resistivity.
Now, substituting all the values and calculating will give us the resistivity and the maximum permissible error.
Topper's Solved these Questions
- EXPERIMENTAL PHYSICSBOOK - RESONANCE ENGLISHCHAPTER - EXPERIMENTAL PHYSICSEXERCISE - Exercise
12 Videos
- EXPERIMENTAL PHYSICSBOOK - RESONANCE ENGLISHCHAPTER - EXPERIMENTAL PHYSICSEXERCISE - Exercise -1 PART
1 Videos
- ELECTROSTATICSBOOK - RESONANCE ENGLISHCHAPTER - ELECTROSTATICSEXERCISE - HLP
40 Videos
- GEOMATRICAL OPTICS BOOK - RESONANCE ENGLISHCHAPTER - GEOMATRICAL OPTICS EXERCISE - Advance level Problems
35 Videos
Similar Questions
A screw gauge has least count of 0.01 mm and there are 50 divisions in its circular scale:
The pitch of the screw gauge is:
View SolutionThe circular head of a screw gauge is divided into 50 divisions and the screw moves 1 mm ahead in two revolutions of the circular head. Find its pitch .
View Solution
Knowledge Check
The density of a solid ball is to be determined in an experiment. The diameter of the ball is measured with a screw gauge, whose pitch is 0.5mm and there are 50 divisions on the circular scale. The reading on the main scale is 2.5mm and that on circular scale is 20 divisions. if the measured mass of the ball has a relative error of 2%, the relative percentage error in the density is
A0.9%B2.4%C3.1%D4.2%
screw gauge of pitch 0.1 cm and 50 divison on circular scale measure thickness of object which of following measurement is possible for thickness
View SolutionThe pitch of a screw gauge is 0.5 mm. It's head scale contains 50 divisions. The least count of the screw gauge is
View SolutionThe circular scale of a screw gauge has 50 divisions and pitch of 0.5 mm. Find the diameter of sphere. Main scale reading is 2 -
_E01_289_Q01.png)
View SolutionThe circular scale of a screw gauge has 50. divisions and pitch of 0.5 mm. Main scale reading is 2. Find the diameter of sphere.

View SolutionThe pitch of a screw gauge is 1mm and its cap is divided into 100 divisions. When this screw gauge is used to measure the diameter of a wire, then main scale reading is 2mm and 58th division of circular scale coincides with the main scale. There is no zero error in the screw gage. Then the diameter of the wire is
View SolutionIn the determination if Young's modulus ((Y=4MLgπld2 by using searle's method, a wire of length L=2m and diameter d=0.5mm is used. For a load M=2.5kg, an extension l=0.25mm in the length of the wire is observed. Quantites Dandl are measured using a screw gauge and a micrometer, respectively. they have the same pitch of 0.5mm. the number of divisions on their circular scale is 100. the contrubution to the maximum probable error of the Y measurement
View SolutionResistance of the conductor of length 5m and area of cross -section 4mm2 s 0.02Ω. Its resistivity is
View Solution
