Draw an isometric view of a cuboid 6cm×4cm×2cm.
To draw the isometric view of a cuboid with dimensions 6 cm (length) x 4 cm (breadth) x 2 cm (height), follow these steps:
1. Draw the Base Length:
- Start by drawing a horizontal line that represents the length of the cuboid. Measure and draw a line of 6 cm.
- Hint: Use a ruler to ensure the line is straight and accurately measures 6 cm.
2. Draw the Height:
- From one end of the 6 cm line, draw a vertical line upwards to represent the height of the cuboid. This line should be 2 cm long.
- Hint: Make sure the vertical line is perpendicular to the base line.
3. Complete the Vertical Edge:
- From the top of the 2 cm vertical line, draw another line parallel to the base line. This line represents the other edge of the cuboid and should also be 6 cm long.
- Hint: Ensure that this line is parallel to the first line you drew.
4. Draw the Breadth:
- From the end of the 6 cm line you just drew, draw a line downwards (parallel to the height line) that is 2 cm long.
- Hint: This line should connect back to the base, forming a vertical edge of the cuboid.
5. Connect the Points:
- Now, connect the ends of the 2 cm vertical line to the ends of the 6 cm horizontal line to complete the front face of the cuboid.
- Hint: Make sure to keep the lines straight and connect them accurately.
6. Draw the Back Face:
- From the top of the 2 cm vertical line, draw a line parallel to the base line that is 4 cm long (representing the breadth).
- Hint: This line should be drawn at an angle to maintain the isometric perspective.
7. Complete the Back Face:
- From the end of this 4 cm line, draw a vertical line downwards that is also 2 cm long.
- Hint: This line should connect to the base line.
8. Final Connections:
- Connect the ends of the 4 cm line to the base line to complete the back face of the cuboid.
- Hint: Ensure all lines are straight and correctly aligned to maintain the isometric view.
Final Result:
You should now have a complete isometric view of the cuboid with dimensions 6 cm x 4 cm x 2 cm.
- Start by drawing a horizontal line that represents the length of the cuboid. Measure and draw a line of 6 cm.
- Hint: Use a ruler to ensure the line is straight and accurately measures 6 cm.
- From one end of the 6 cm line, draw a vertical line upwards to represent the height of the cuboid. This line should be 2 cm long.
- Hint: Make sure the vertical line is perpendicular to the base line.
- From the top of the 2 cm vertical line, draw another line parallel to the base line. This line represents the other edge of the cuboid and should also be 6 cm long.
- Hint: Ensure that this line is parallel to the first line you drew.
- From the end of the 6 cm line you just drew, draw a line downwards (parallel to the height line) that is 2 cm long.
- Hint: This line should connect back to the base, forming a vertical edge of the cuboid.
- Now, connect the ends of the 2 cm vertical line to the ends of the 6 cm horizontal line to complete the front face of the cuboid.
- Hint: Make sure to keep the lines straight and connect them accurately.
- From the top of the 2 cm vertical line, draw a line parallel to the base line that is 4 cm long (representing the breadth).
- Hint: This line should be drawn at an angle to maintain the isometric perspective.
- From the end of this 4 cm line, draw a vertical line downwards that is also 2 cm long.
- Hint: This line should connect to the base line.
- Connect the ends of the 4 cm line to the base line to complete the back face of the cuboid.
- Hint: Ensure all lines are straight and correctly aligned to maintain the isometric view.
You should now have a complete isometric view of the cuboid with dimensions 6 cm x 4 cm x 2 cm.
Topper's Solved these Questions
- PRACTICAL GEOMETRY SYMMETRY AND VISUALISING SOLID SHAPESBOOK - NCERT EXEMPLARCHAPTER - PRACTICAL GEOMETRY SYMMETRY AND VISUALISING SOLID SHAPESEXERCISE - THINK AND DISCUSS
6 Videos
- PERIMETER AND AREABOOK - NCERT EXEMPLARCHAPTER - PERIMETER AND AREAEXERCISE - Think and Discuss
7 Videos
- RATIONAL NUMBERSBOOK - NCERT EXEMPLARCHAPTER - RATIONAL NUMBERSEXERCISE - Application
2 Videos
Similar Questions
Knowledge Check
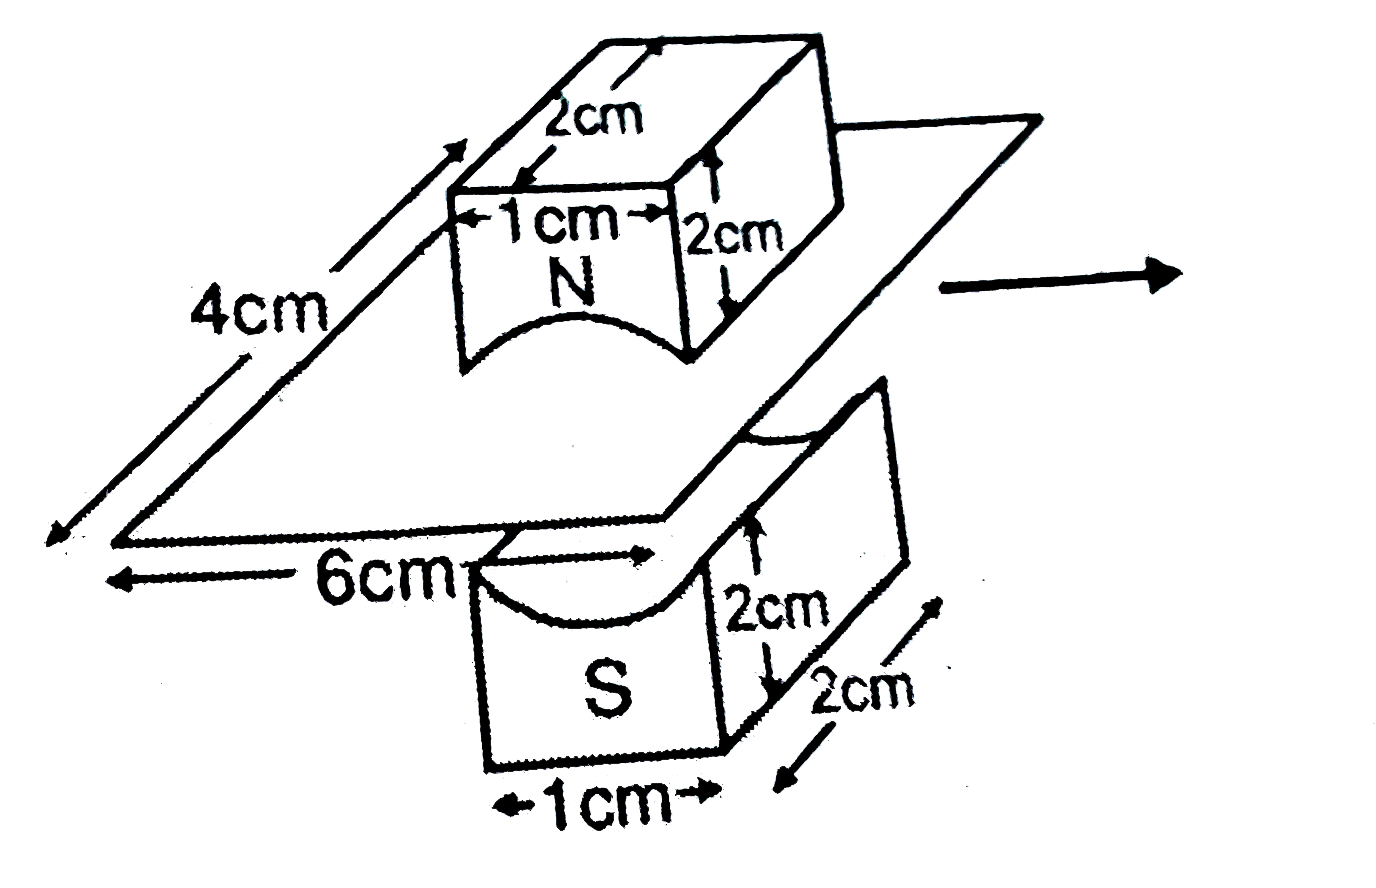
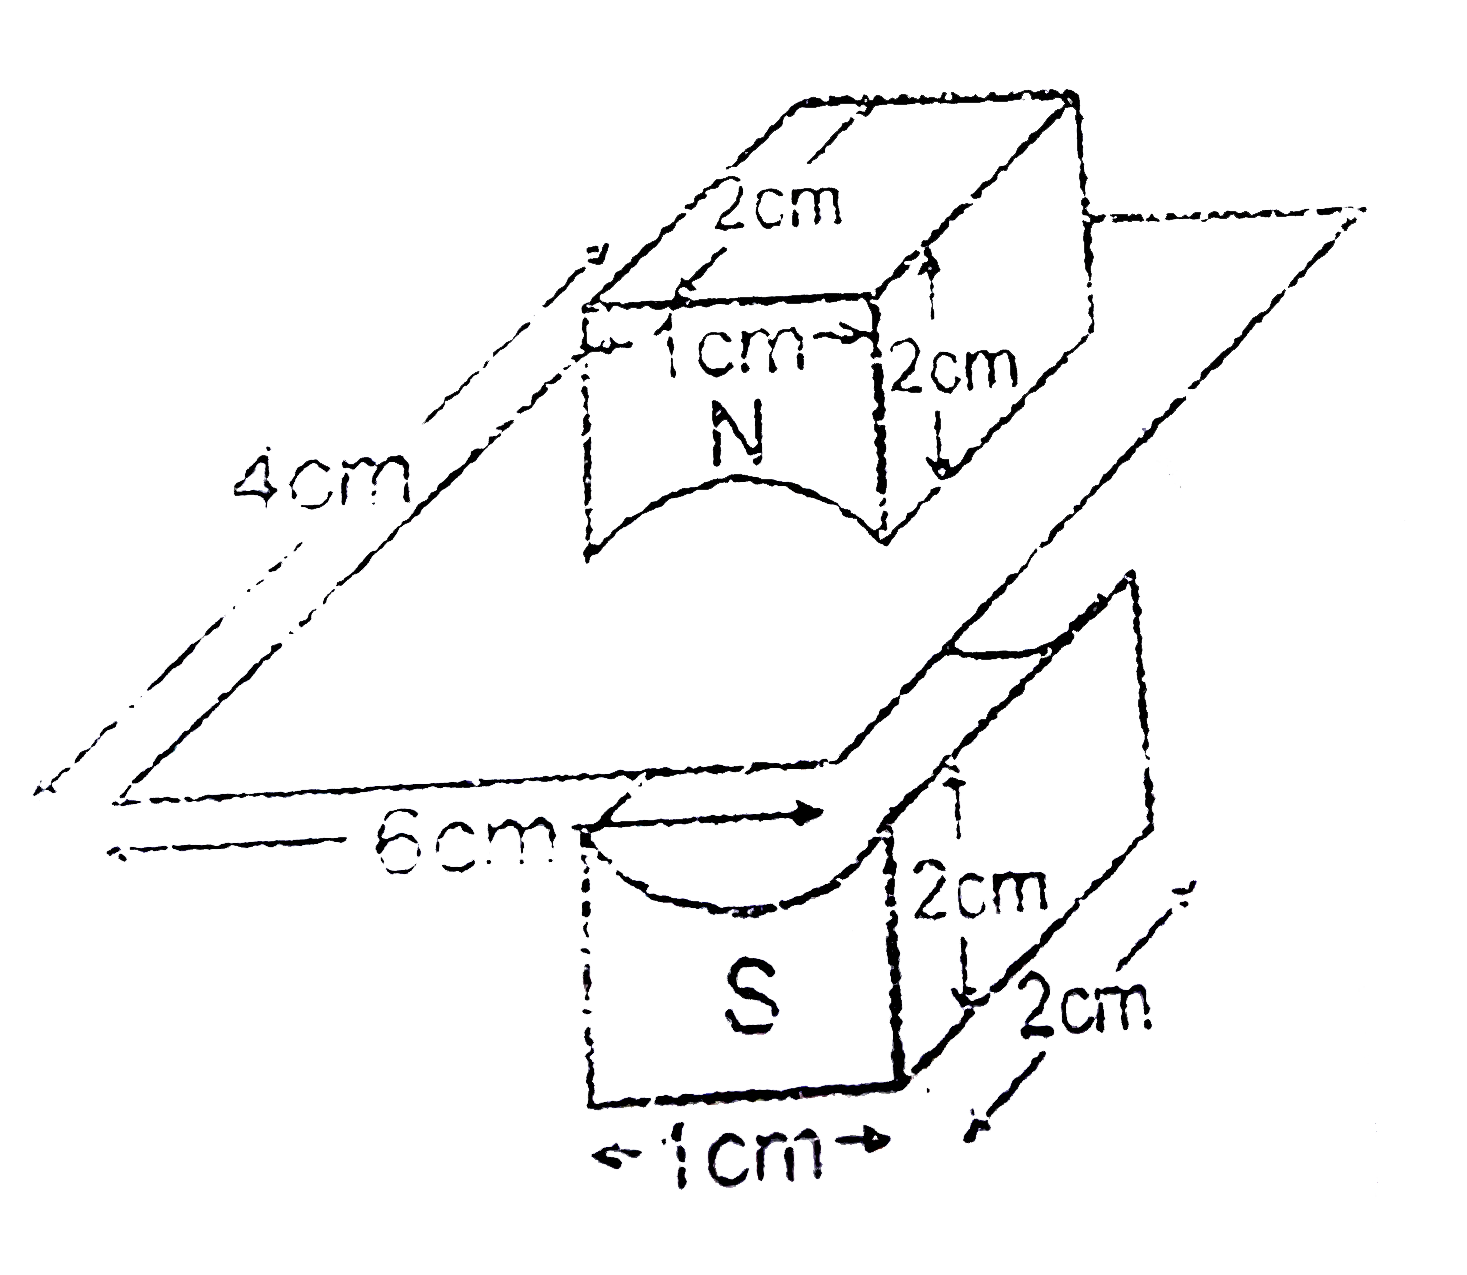
A magnetic field (B), uniform between two magnets can be determined measuring the induced voltage in the loop as it is pulled through the gap at uniform speed 20 m/sec. Size of magnet and coil is 2cm×1cm×2cmand4cm×6cm as shown in figure. The correct variation of induced emf with time is :
(Assume at t=0, the coil enters in the magnetic field):
 A
A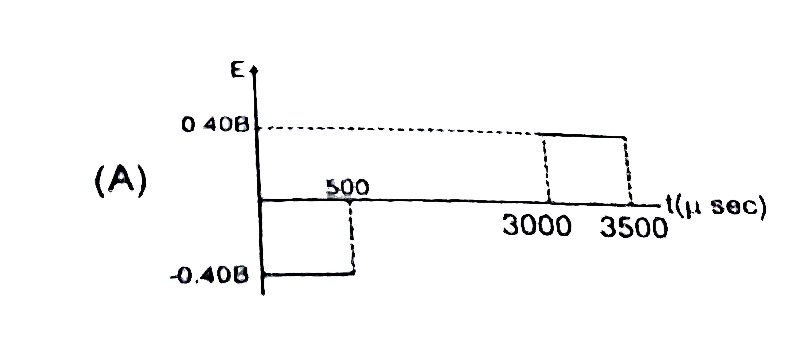 B
B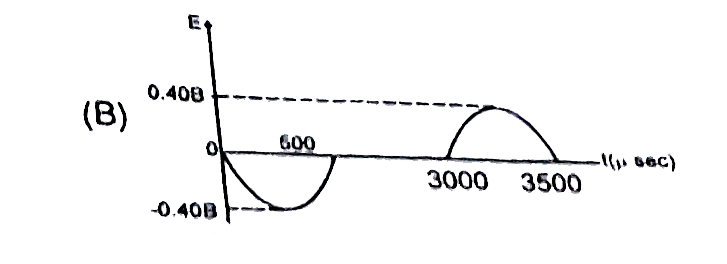 C
C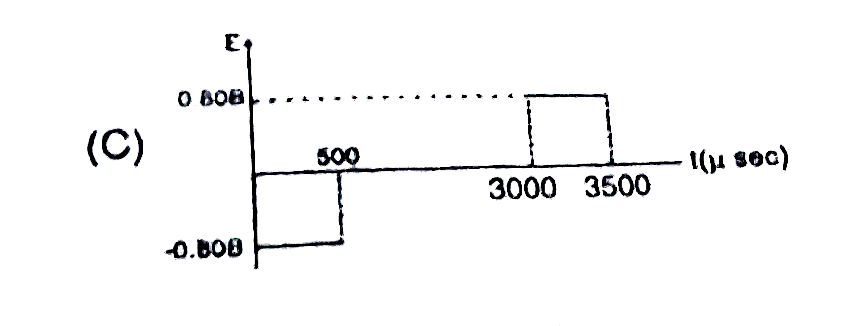 D
D
A magnetic field (B), uniform between two magnets can be determined measuring the induced voltage in the loop as it is pulled through the gap at uniform speed 20m/sec.Size of magnet and coil is 2cm×1cm×2cm and 4cm×6cm as shown in figure.The correct variation of induced emf with time is :(Assume at t=0,the coil enters in the magnetic field):
 A
A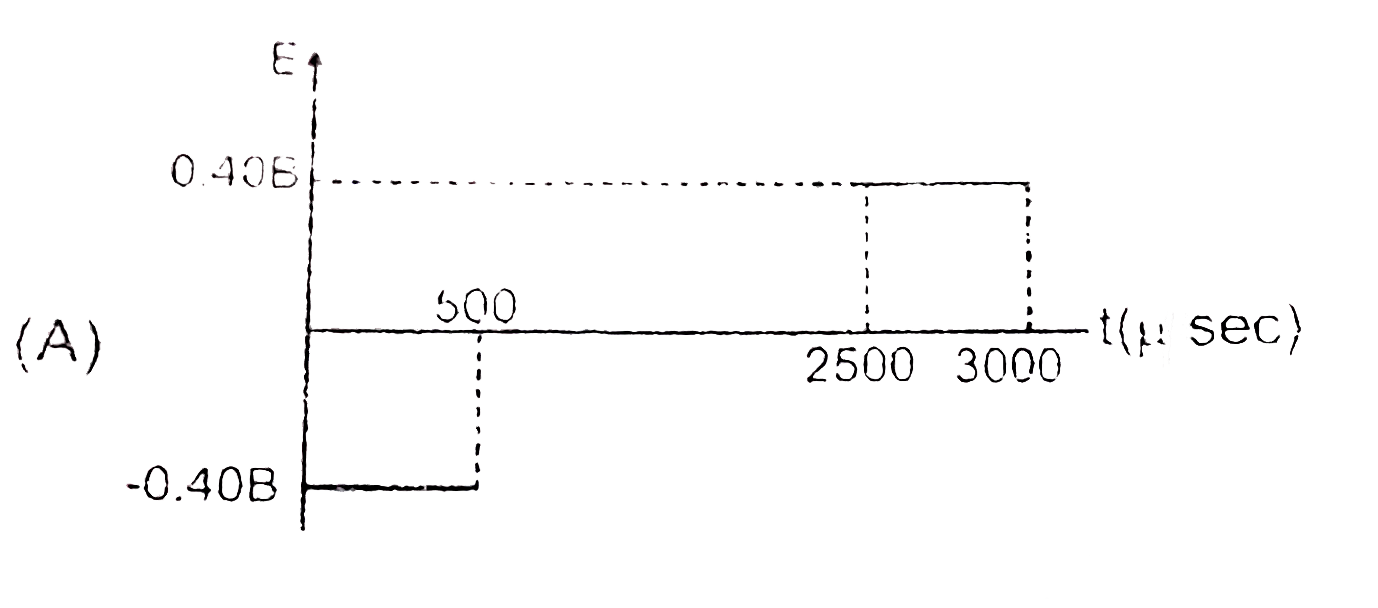 B
B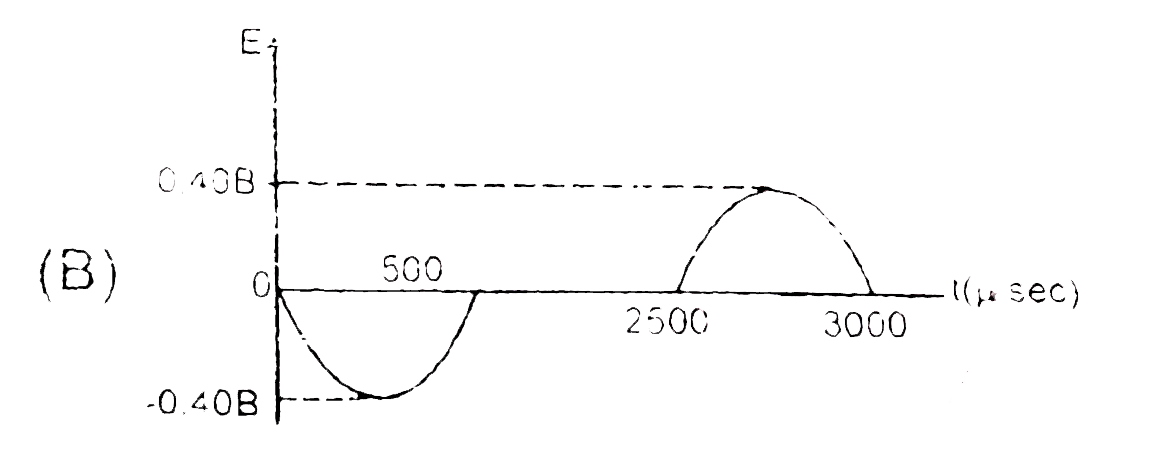 C
C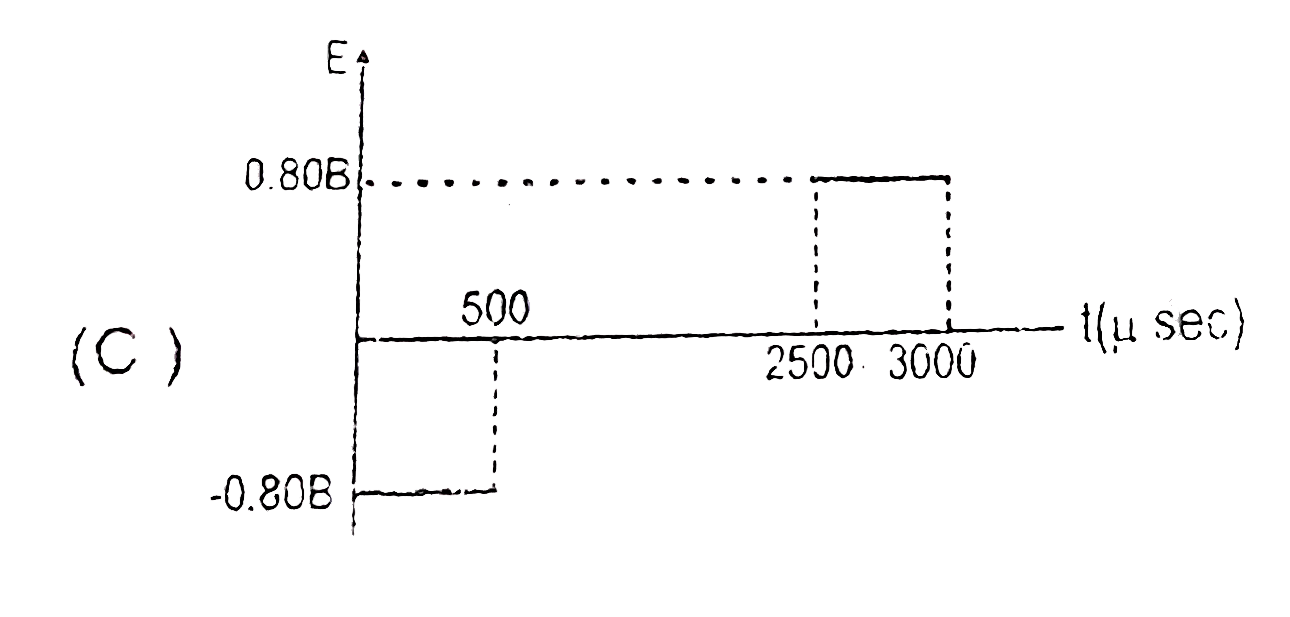 D
D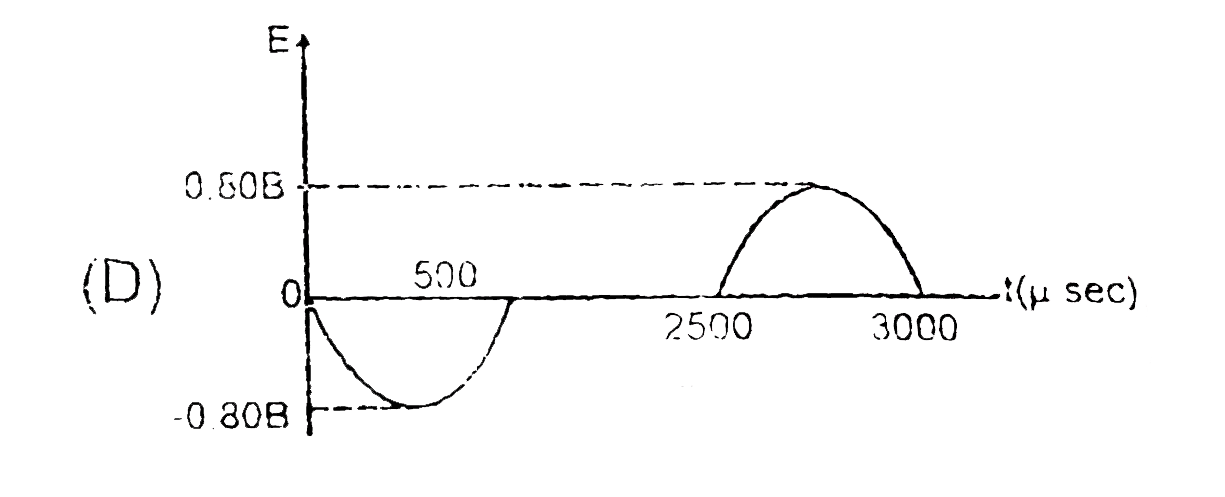
A cone of height 7 cm and base radius 1 cm is curved froma conical block of wood 10m×5×2 cm . The percentage wood wastage in the process is (π=227)
A9223%B4613%C5323%D713%
Three cubes each with 2 cm edge are placed side by side to form a cuboid. Sketch an oblique or isometric sketch of this cuboid.
View SolutionHow many bricks, each of size 25cm×13.5cm×6cm, will be required to build a wall 8 m long, 5.4 m high and 33 cm thick?"
View SolutionThe magnetic moment of a magnet (15cm×2cm×1cm)is1.2A−m2. Calculate its intensity of magnetisation
View SolutionWhat is the total surface area of the identical cubes of largest possible size that are cut from a cuboid of size 85cm×17cm×5.1cm ?
View SolutionA student was performing an experiment to observe pressure exerted by a solid cuboid of A of dimensions 10cm×8cm×4cmon wheat flour then he took another cuboid B of same weight and of dimensions 20cm×4cm×2cmhe successively placed cuboid A on its face 10cm×8cm and then cuboid B on its face 20cm×cm on wheat flour and measured depression he would find that depression produced by B and A will be in the ratio of
View Solution
