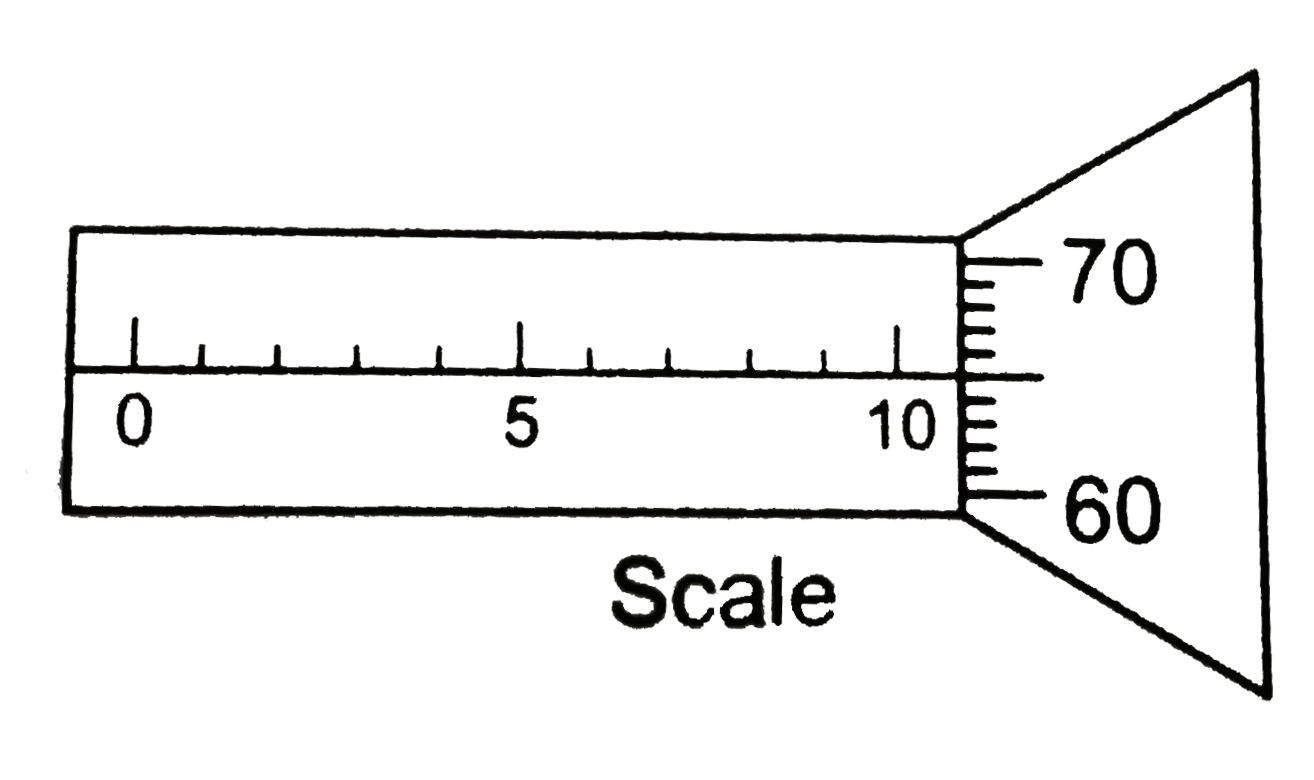
Internal micrometer is a measuring intrument used to measure internal diameter (ID) of a large cylinder bore with high accuracy. Construction is shown in figure. There is one fixed rod B (to the right in figure) and one moved rod A (to the left in figure). It is based on the particle of advancement of a screw when it is rotated in a nut with internal threads. Main scale reading can be directly seen on the hub which is fixed with respect to rod B. When the cap is rotated rod A moves in or cut depending on direction of rotation. The circular scale reading is seen by checking which division of circular scale coincide with the references line
_E01_258_Q01.png)
This is to be multiplied by LC to get circular scale reading.
Least count = value of 1 circular scale division
Length of rod A is chosen to match the to be measured. Zero error is checked by taking reading between standard blocks fixed at normal value of to be measured. Zero error is positive if cap end is one the right of the main scale and negative it is on the left side.
_E01_258_Q02.png)
In the above instrument, while measuring an internal diameter. is set of 321 mm with no zero error. It cap end is after division adn division of main scale coincides with the reference line, the is -Solution in Gujrati
321.717 mm
321.87 mm
328.17 mm
324.67 mm
The correct Answer is:D
Topper's Solved these Questions
- ERROR AND MEASUREMENTBOOK - ALLEN CHAPTER - ERROR AND MEASUREMENTEXERCISE - Part-2(Exercise-2)(A)
16 Videos
- ERROR AND MEASUREMENTBOOK - ALLEN CHAPTER - ERROR AND MEASUREMENTEXERCISE - Part-2(Exercise-2)(B)
22 Videos
- ERROR AND MEASUREMENTBOOK - ALLEN CHAPTER - ERROR AND MEASUREMENTEXERCISE - Part-2(Exercise-2)(B)
22 Videos
- ELASTICITY, SURFACE TENSION AND FLUID MECHANICSBOOK - ALLEN CHAPTER - ELASTICITY, SURFACE TENSION AND FLUID MECHANICSEXERCISE - Exercise 5 B (Integer Type Questions)
3 Videos
- KINEMATICSBOOK - ALLEN CHAPTER - KINEMATICSEXERCISE - EXERCISE-2
89 Videos
Similar Questions
The 'rad' is the correct unit used to report the measurement of :
View SolutionA cube has a side of length 1.2×10⁻²m. Calculate its volume.
View SolutionA cube has a side of length 1.2×10⁻²m. Calculate its volume.
View SolutionTwo soap bubbles A and B are kept in a closed chamber where the air is maintained at pressure 8N/m2.The radii of bubbles A and B are 2cm and 4cm, respectively. Surface tension of the soap-water used to make bubbles is 0.04N/m. Find tha ratio nB/nA, where nA and nB are the number of moles of air in bubbles A and B, respectively. [Neglect the effect of gravity.]
View SolutionA student performs an experiment to determine how the range of a ball depends on the velocity with which it is projected. The "range" is the distance between the points where the ball lends and from where it was projected, assuming it lands at the same height from which it was projected. It each trial, the student uses the same baseball, and launches it at the same angle. Table shows the experimental results.
∣∣ ∣ ∣ ∣ ∣ ∣∣TrailLaunch speed(m/s)Range(m)110822031.833070.7440122.5∣∣ ∣ ∣ ∣ ∣ ∣∣
Based on this data, the student then hypothesizes that the range, R, depends on the initial speed v0 according to the following equation : R=Cvn0, where C is a constant and n is another constant.
Based on this data, the best guess for the value of n is :-
View SolutionIn a screw gauge, the zero of mainscale coincides with fifth division of circular scale in figure (i). The circular division of screw gauge are 50 . It moves 0.5 mm on main scale In one rotation. The diameter of the ball in figure (ii) is
View SolutionRead the screw gauge shown below in the figure.
Given that circular scale has 100 divisions and in one complete rotation the screw advances by 1mm.
 .
.
View SolutionA rod AB is shown in figure. End A of the rod is fixed on the ground. Block is moving with velocity 2 ms^-1 towards right. The velocity of end B of rod at the instant shown in figure is
View SolutionWhat is the reading of micrometer screw gauge shown in figure
View SolutionInternal micrometer is a measuring intrument used to measure internal diameter (ID) of a large cylinder bore with high accuracy. Construction is shown in figure. There is one fixed rod B (to the right in figure) and one moved rod A (to the left in figure). It is based on the particle of advancement of a screw when it is rotated in a nut with internal threads. Main scale reading can be directly seen on the hub which is fixed with respect to rod B. When the cap is rotated rod A moves in or cut depending on direction of rotation. The circular scale reading is seen by checking which division of circular scale coincide with the references line
_E01_257_Q01.png)
This is to be multiplied by LC to get circular scale reading.
Least count = value of 1 circular scale division =pitchnumber of division on circular scale
Length of rod A is chosen to match the ID(PQ) to be measured. Zero error is checked by taking reading between standard blocks fixed at normal value of ID to be measured. Zero error is positive if cap end is one the right of the main scale and negative it is on the left side.
_E01_257_Q02.png)
In an internal micrometer, main scale division is of 0.5 mm and there are 50 divisions in circular scale. The least count of the instrument is-
View SolutionInternal micrometer is a measuring intrument used to measure internal diameter (ID) of a large cylinder bore with high accuracy. Construction is shown in figure. There is one fixed rod B (to the right in figure) and one moved rod A (to the left in figure). It is based on the particle of advancement of a screw when it is rotated in a nut with internal threads. Main scale reading can be directly seen on the hub which is fixed with respect to rod B. When the cap is rotated rod A moves in or cut depending on direction of rotation. The circular scale reading is seen by checking which division of circular scale coincide with the references line
_E01_259_Q01.png)
This is to be multiplied by LC to get circular scale reading.
Least count = value of 1 circular scale division =pitchnumber of division on circular scale
Length of rod A is chosen to match the ID(PQ) to be measured. Zero error is checked by taking reading between standard blocks fixed at normal value of ID to be measured. Zero error is positive if cap end is one the right of the main scale and negative it is on the left side.
_E01_259_Q02.png)
During zero setting of the above instrument, the end of the cap is on left side of the zero of main scale (i.e. zero of main scale is not visible) and 41th division of circular scale coincides with the reference line, the zero error is -
View SolutionA ruler marked is inches is used to measure the diameter of a rod as shown in the figure below. Find the diameter if the rod in inches. If one inch is approximately equal to 25. 4m, express tehis diameter in cm ( correct to 2 decimal places).
View SolutionFind the area of cross-section of a rod the diameter of which is measured with a screw gauge with readings as shown in the figure
View SolutionDiagrams show readings of a screw gauge. Figure (i) shows the zero error reading when the screw gauge is closed, figure (ii) the reading when the screw gauge is being used to measure the diameter of a ball-bearing. What is the diameter of the ball-earing ? There are 50 divisions on circular scale.

View SolutionWhat is the reading of micrometer screw gauge shown in figure?

View SolutionRead the screw gauge shown below in the figure.
Given that circular scale has 100 divisions and in one complete rotation the screw advances by 1mm.
 .
.
View Solution
