Two full turns of the circular scale of a screw gauge cover a distance of 1 mm on its main scale. The total number of divisions on the circular scale is 50. Further, it is found that the screw gauge has a zero error of - 0.03 mm. While measuring the diameter of a thin wire, a student notes the main scale reading of 3 mm and the number of circular scale divisions in line with the main scale, as 35. What is the diameter of the wire?
Pitch of screw gauge = 12mm=0.5mm
Least count of the screw gauge = 0.550mm=0.01mm
Zero error = - 0.03 mm, Zero correction = + 0.03 mm
Main scale reading = 3 mm
Circular scale reading = 35
Observed diameter of the wire = 3mm+35×(0.01)mm=3.35mm
Corrected diameter of the wire =(3.35+0.03)mm=3.38mm
Similar Questions
Two full turns of the circular scale of a screw gauge cover a distance of 1mm on its main scale. The total number of divisions on the circular scale is 50. Further, it is found that the screw gauge has a zero error of −0.03mm. While main scale reading of 3mm and the number of circular scale divisions in line with the main scale as 35. the dimeter of the wire is
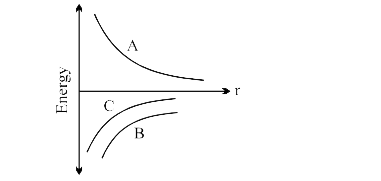
View SolutionThe figure shows the variation of energy with the orbit radius of a body in circular planetary motion.

Find the correct statement about the curves A, B and C
View Solution
Knowledge Check
Two full turns of the circular scale of a screw gauge cover a distance of 1 mn on its its main scale . The total number of divisions on the circular scale is 50. Further m it is found that the screw gauge has a zero error of - 0.02 mm . While measuring the diameter of a thin wire , a student notes the main scale reading of 4 mm and the number of circular scale divisions in line with the main scale as 37. The diameter of the wire is
A4.37 mmB4.39 mmC4.74 mmD4.76 mmTwo full turns of the circular scale of a screw gauge cover a distance of 1mm on its main scale. The total number of divisions on the circular scale is 50. Further, it is found that the screw gauge has a zero error of −0.03mm. While main scale reading of 3mm and the number of circular scale divisions in line with the main scale as 35. the dimeter of the wire is
A(a) 3.32mmB(b) 3.73mmC( c ) 3.67mmD(d) 3.38mmOn six complete rotations, the screw gauge moves by 3 mm on the main scale. If there are 50 divisions on the circular scale the least count of the screw gauge is
A0.01 cmB0.02 mmC0.001 mmD0.001 cm
The pitch of a screw gauge is 1 mm and its circular scale has 100 divisions. In measurement of the diameter of a wire, the main scale reads 2 mm and 45th mark on circular scale coincides with the base line. Find the diameter of the wire.
View Solutionthe least count of the main scale of a screw gauge is 1 mm. the minimum number of divisions on its circular scale required to measure 5μm diameter of a wire is :
View Solutionthe least count of the main scale of a screw gauge is 1 mm. the minimum number of divisions on its circular scale required to measure 5μm diameter of a wire is :
View SolutionCircular scale of a screw gauge moves through 4 divisions of main scale in one rotation. If the number of divisions on the circular scale is 200 and each division of the main scale is 1 mm., the least count of the screw gauge is
View SolutionMain scale of a screw gauge is 3mm and 42 division of circular scale of 100 divisions coincides with reference line then find the diameter of the cylinder
View Solution
