While measuring length of small iron rod, following five reading wee obtained.
12.66mm,12.58mm,12.62mm,12.80mmand12.72mm
The experimenter reported the result of the experiment based on the obove readings.
Number of significant figures in the length reported will be 3.
Number of significant figures in the lenth reported will be 4.
Number of significant figure in the error reported will be 1.
Number of significant figures in the error reported will be 2.
The correct Answer is:B
Step by step video, text & image solution for While measuring length of small iron rod, following five reading wee obtained. 12.66 mm, 12.58 mm, 12.62 mm, 12.80 mm and 12.72mm The experimenter reported the result of the experiment based on the obove readings. by Physics experts to help you in doubts & scoring excellent marks in Class 12 exams.
Updated on:21/07/2023Similar Questions
A student measuring the diameter of a pencil of circular cross-section with the help of a vernier scale records the following four reading 5.50 mm, 5.55 mm, 5.45 mm , is 5.5375 mm and the standard deviation of the date is 0.07395 mm. The average diameter of the pencil should therefore be recorded as :
View SolutionThe main scale of a vernier calliper reads in mm and its vernier scale is divided into 8 divisions, which coincides with 7 divisions of the main scale. It was also observed that, when the two jaws are brought in contact, the zero of the vernier scale coincided with the zero of the main scale. The edge length of a cube is measured using this vernier calliper. The main scale reads 12 mm and 2nd division of the vernier scale coincides with the main scale. The edge length (in mm) of the cube is
View Solution
Knowledge Check
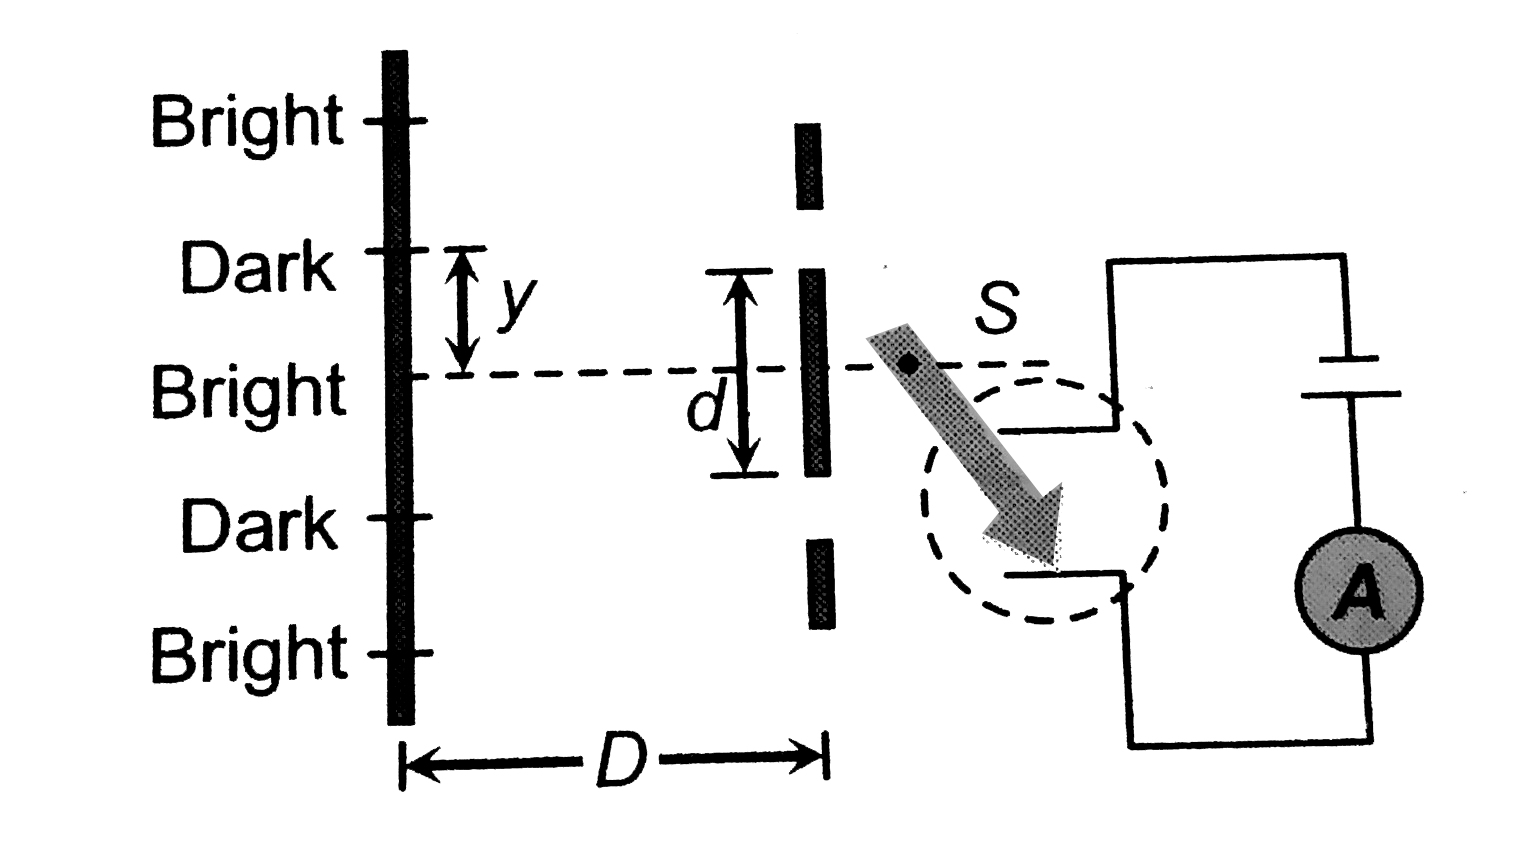
In the following arrangement y=1.0mm,d=0.24mm and D=1.2m. The work function of the material of the emitter is 2.2eV. The stopping potential V needed to stop the photo current will be
 A0.9VB0.5VC0.4VD0.1V
A combined double screw gauge as shown in the figure is used as

If the readings on the two scales with the tips of the screws touching each other are 2.97 mm and 6.04 mm when a rod is held between the screws readings are 12.55 mm and 5.96 mm what is the diameter of the ord ?A9.5 mmB9.6 mmC9.58 mmDNot possible to determineIn a specially designed vernier calipers, 10 divisions of the vernier scale are equal to 4 divisions of the main scale. In the following figure, the zero error and a measurement are shown. In the zero error, the 5^(th) and the 10^(th) divisions of the vernier coincides with 1 mm and 3 mm mark on the main scale respectively and in the measurement, the 2^(nd) and the 7^(th) divisions of the vernier scale coincide with the 23 mm and 25 mm mark on the main scale respectively as shown in the figure. Report the length measured with due regards to the error.
 A(21.2±0.2)mmB(23.2±0.2)mmC(23.8±0.4)mmD(23.4±0.6)mm
Light of 530 nm wavelenght falls on a grating with a grating constant of 1.50 μ m. and with a total length of 12.0 mm. Find the angular width of a principal maximum and the resolving power of the grating.
View SolutionA faulty mercury thermometer has a stem of uniform cross section marked in mm. If this reads 83 mm instead of 80 mm at LEP and 229 mm instead of 220 mm at UFP, find the difference in the length of the mercury thread in both the faulty and correct thermometers at 250∘C. (Take LFP =0∘C and UFP =100∘C)
View SolutionA student performs an experiment to determine the Young's modulus of a wire, exactly2m long, by Searle's method. In a partcular reading, the student measures the extension in the length of the wire to be 0.8mmwithanuncerta∫yof+- 0.05mmataloadofexactly1.0kg,thestudentalsomeasuresthediameterofthewire→be04mmwithanuncerta∫yof+-0.01mm.Takeg=9.8m//s^(2) (exact). the Young's modulus obtained from the reading is
View SolutionTo determine the diameter of a rod a student wound a thread 5 times round the rod and measured the length of thread as 156 mm on a metre scale. Using this value he calculated the diameter of the rod. If the actual diameter of the rod is 9.94 mm, what is the error that could result in the method followed by the
student? Take pr+q2
View Solution
