Consider a home made vernier scale as shown in the figure. In this diagram, we are interested in measuring the length of the line PQ. If both the inclined are indentical and their angles are equal to then what is the least count of the instrument.
_E01_261_Q01.png)
The correct Answer is:
Step by step video, text & image solution for Consider a home made vernier scale as shown in the figure. In this diagram, we are interested in measuring the length of the line PQ. If both the inclined are indentical and their angles are equal to theta then what is the least count of the instrument. by Physics experts to help you in doubts & scoring excellent marks in Class 12 exams.
Updated on:21/07/2023Topper's Solved these Questions
- SEMICONDUCTORSBOOK - BANSALCHAPTER - SEMICONDUCTORSEXERCISE - Exercise-4
37 Videos
- SEMICONDUCTORSBOOK - BANSALCHAPTER - SEMICONDUCTORSEXERCISE - Exercise-4 Section-B
6 Videos
- SEMICONDUCTORSBOOK - BANSALCHAPTER - SEMICONDUCTORSEXERCISE - Exercise-2
24 Videos
- MASTER PRACTICE PROBLEMBOOK - BANSALCHAPTER - MASTER PRACTICE PROBLEMEXERCISE - Additional topic
70 Videos
- TEST PAPERSBOOK - BANSALCHAPTER - TEST PAPERSEXERCISE - PHYSICS PART C
14 Videos
Similar Questions
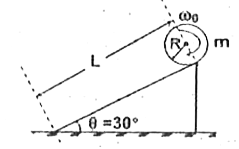
A ball of mass m and radius R rotating with an angular speed ω0 as shown in the figure is placed on an incline plane. Coefficient of friction is 1/√3 and the length of the incline plane is L. The angle of inclination of the plane is θ=30∘. Find after what time it will reach at the bottom most point.

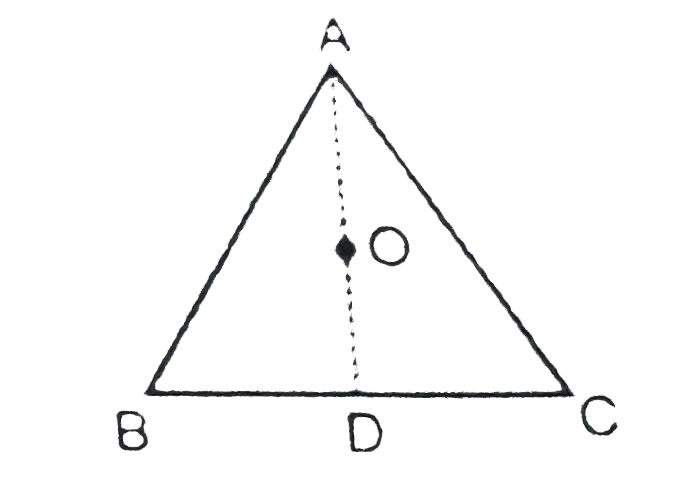
View SolutionConsider an equilateral triangle ABC of side 2a in the plane of the paper as shown. The centroid of the triangle is O. Equal charges (Q) are fixed at the vertices A, B and C In what follows consider all motion and situations to be confined the plane of the paper.

(a) A test charge (q), of same sign as Q is placed on the median AD at a point at a distance δ below O. Obtain the force (→F) felt by the test charge.
(b) Assuming δ<<a discuss the motion of the test charge when it is released.
(c) Obtain the force (→FD) on this test charge if it is placed at the point D as shown in the figure.
(d) In the figure below mark the approximate locations of the equilibrium point (s) for this system. Justify your answer.
(e) Is the equilibrium at O stable or unstable if we displace the test in the direction of OP ? The line PQ is parallel to the base BC. Justify your answer.
(f) Consider a rectangle ABCD. Equal charges are fixed at the vertices A, B, C and D. O is the centroid. In the figure below mark the approximate locations of all the neutral points of the system for a test charge with same sign as the charges on the vertices. Dotted lines are drawn for the reference.
(g) How many neutral points are possible for a system in which N charges are placed at the N vertices of a regular N sided polygon ?
View Solution
Knowledge Check
While measuring length of an object it was observed that the zero of the vernier lies between 1.4 and 1.5 of the main scale and the fifth division coincides with a main scale division. If the length of the object measured is l, then the value of (l-1.4) in terms of the least count C of the instrument is:
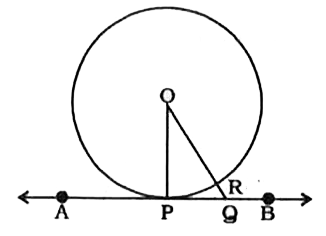
ACB1.45CC4CD5CConsider the following diagram in which AB is the tangent to the circle. Find the length of OQ (in cm) if the measure of largest chord of that circle is 6 cm and PQ is 4 cm.
 A2B3C4D5
Internal micrometer is a measuring intrument used to measure internal diameter (ID) of a large cylinder bore with high accuracy. Construction is shown in figure. There is one fixed rod B (to the right in figure) and one moved rod A (to the left in figure). It is based on the particle of advancement of a screw when it is rotated in a nut with internal threads. Main scale reading can be directly seen on the hub which is fixed with respect to rod B. When the cap is rotated rod A moves in or cut depending on direction of rotation. The circular scale reading is seen by checking which division of circular scale coincide with the references line
_E01_257_Q01.png)
This is to be multiplied by LC to get circular scale reading.
Least count = value of 1 circular scale division =pitchnumber of division on circular scale
Length of rod A is chosen to match the ID(PQ) to be measured. Zero error is checked by taking reading between standard blocks fixed at normal value of ID to be measured. Zero error is positive if cap end is one the right of the main scale and negative it is on the left side.
_E01_257_Q02.png)
In an internal micrometer, main scale division is of 0.5 mm and there are 50 divisions in circular scale. The least count of the instrument is-A0.005 mmB0.001 mmC0.05 mmD0.01 mm
In a vernier calliper, vernier scale has 20 division which match with 19th division of main scale. The least count of main scale is 1 mm. When two jaws of vernier calliper is in contact, zero of main scale is visible and 14th vernier scale division match with a main scale division. In measuring the length of iron rod by this instrument, main scale reads 35 division and 8th division of vernier scale coincides with a main scale division. Find length of rod in cm.
View SolutionThe smallest division on main scale of a vernier caplliers is 1mmand10 vernier divisions coincide with 9 main scale divisions. While measuring the length of a line, the zero mark of the vernier scale lies between 10.2cmand10.3cm and the third division of vernier scale coincides with a main scale division.
(a) Determine the least count of the callopers.
(b) Find the length of the line.
View SolutionLeast count of a vernier calliper is 0.01 cm. While measuring the length of any object, the reading of main scale is 2.7 cm and 5th mark of vernier is in line with any mark of main scale. What is the length of that object?
View SolutionLeast count of a vernier calliper is 0.01 cm. While measuring the length of any object, the reading of main scale is 2.7 cm and 5th mark of vernier is in line with any mark of main scale. What is the length of that object?
View SolutionIn a experiment the angle are required to be measured using an instrument. 26 divisions of the main scale exactly coincide with the 30 divisions of the vernier scale . If the smallest division of the main scale is half -a-degree (=0.5∘) then the least count of the instrument is .
View Solution
